Film-Tech Cinema Systems
Film-Tech Forum ARCHIVE


my profile | my password | search | faq & rules | forum home
  next oldest topic   next newest topic
» Film-Tech Forum ARCHIVE   » Operations   » Film Handlers' Forum   » Christie P-35 Rotary Douser Installation (Page 1)

 
This topic comprises 2 pages: 1  2 
 
Author Topic: Christie P-35 Rotary Douser Installation
Mark Gulbrandsen
Resident Trollmaster

Posts: 16657
From: Music City
Registered: Jun 99


 - posted 07-25-2007 06:33 PM      Profile for Mark Gulbrandsen   Email Mark Gulbrandsen   Send New Private Message       Edit/Delete Post 
Or I should have titled this... How to make your P-35 sound like it can "Kick The Can"!

This design is ok... you might even think as I did that Uncle Rube had a small hand in it's design. The good part is that it will take the heat from large lamps just about indefinately because of its ceramic insert...

The well written instructions with color pictures are nice, however Christie has omitted some of the instructions if you're installing it on older P-35GP's... Cristie is famous for ignoring the older stuff... [Eek!] [Big Grin] .

The instruction if followed and you have all the tools needed at your disposal should take you about two hours to go through the first time round. They are clear and concise but... They fail to mention that there is no longer room at the top for the fan... so it has to be re-located to the bottom... where they surprisingly are on all new Christies made now. Not a difficult thing to do but not surprising they failed to mention it either. There is also an additional air baffle that needs installing and many machines are not going to have the hole there for this baffle. Christie has omitted accurate layout dimensions for this hole but they actually include a drill jig [Smile] for the hole needed for the manual top rotary shaft. So aside from removing the front panel of the SLC to get at the screws (this part is in the instructons) you also need to remove the front lamp support so you can get the drill in there to make the hole... which is going to be at an angle when you're done unless you own a very squatty right angle drill. In the end all this works out fine and there is little chance of the chsnge-over sticking any longer. Wait.... I still have Three complaints. #1. As fast as the C/O now goes the movement of the dowser is plainly visible on the left side of the screen when its near the end of its travel going open. #2 The projector now sounds like its playing "Kick The Can" and the noise is audible in the auditorium... at least in this theater it was. #3. I pity the tech that has a rivited in place front on his console! The front HAS to be removed to get at some of the Phillips Head screws holding the framing covers in place along the rear. These poor souls may have to remove the entire head from the console just to install this dowser.

What a hoot!

Mark

 |  IP: Logged

Paul Konen
Jedi Master Film Handler

Posts: 981
From: Frisco, TX. (North of Dallas)
Registered: Jun 99


 - posted 07-25-2007 09:07 PM      Profile for Paul Konen   Email Paul Konen   Send New Private Message       Edit/Delete Post 
Great! [Eek!] There are 23 to do at my place. 1 projector has been transferred to another theatre.

I know that looking at the instructions myself seem quite thorough but boy.

I still like Brad's idea that the start cue strike the lamp. No need for a douser then.

 |  IP: Logged

Mark Gulbrandsen
Resident Trollmaster

Posts: 16657
From: Music City
Registered: Jun 99


 - posted 07-25-2007 10:08 PM      Profile for Mark Gulbrandsen   Email Mark Gulbrandsen   Send New Private Message       Edit/Delete Post 
quote: Paul Konen
I still like Brad's idea that the start cue strike the lamp. No need for a douser then.

Thats all and well assuming that your customer doesn't run his lamps to 22,368.7 hours and the lamp strikes on the first try and comes up stable right away.

This dowser works really well and is certainly unique but if you set up an assembly line of sorts after the first one it shouldn't be too bad... a couple of days work for a couple of techs. And when you're done... all that clang'n and bang'n when they open and close.... Make no mistake! You hear it when the film goes on screen and then comes off screen [Eek!] [Roll Eyes] .

Add more time... another half hour to 45 min. if you have to move the fan to down below and drill the hole for the baffle.

Mark

 |  IP: Logged

Brad Miller
Administrator

Posts: 17775
From: Plano, TX (36.2 miles NW of Rockwall)
Registered: May 99


 - posted 07-25-2007 10:47 PM      Profile for Brad Miller   Author's Homepage   Email Brad Miller       Edit/Delete Post 
quote: Mark Gulbrandsen
Thats all and well assuming that your customer doesn't run his lamps to 22,368.7 hours and the lamp strikes on the first try and comes up stable right away.
It's called opaque black leader, Mark. You have the lamp strike on the black leader and then set up your cueing system from there, whether it be 8 seconds later or a minute via a start cue. Removing the douser takes that aspect of failure completely out of the chain. They simply are not needed on platter installations.

 |  IP: Logged

Tristan Lane
Master Film Handler

Posts: 444
From: Nampa, Idaho
Registered: Feb 2002


 - posted 07-25-2007 10:59 PM      Profile for Tristan Lane   Email Tristan Lane   Send New Private Message       Edit/Delete Post 
quote: Mark Gulbrandsen
I pity the tech that has a rivited in place front on his console! The front HAS to be removed to get at some of the Phillips Head screws holding the framing covers in place along the rear.
I've done a lot of these conversions, and on the P35GPS projector where hex head screws were used, a ball head wrench will just barely work the screw out. You may flex the snood a little bit in the process, but it will work. I only removed front panel on the first one I did. My thoughts are, of you are going to end up drilling out all the rivets, you might as well just drill one access hole in the snood lip instead to get access to that one screw.

I'd assume that the old projectors with the phillips screws will require the removal of the front panel, but as far as I know, the majority of SLC consoles have screws on the front panels, and the newer SLC consoles have screws securing the snood.

It is a PITA on the older stuff, but the benefits of the new douser will save countless hours of labor in the future maintaining the original c/o dousers.

And I agree, the ceramic piece makes the douser pretty much impervious to heat.

 |  IP: Logged

Monte L Fullmer
Film God

Posts: 8367
From: Nampa, Idaho, USA
Registered: Nov 2004


 - posted 07-26-2007 01:17 AM      Profile for Monte L Fullmer   Email Monte L Fullmer   Send New Private Message       Edit/Delete Post 
quote: Paul Konen
I still like Brad's idea that the start cue strike the lamp.
...like those small Chinese portable 35mm units - no dowser and just stikes up when the "RUN" button is hit.

Sounds like a good procedure...but, sadly, not in a "booth monkey" operation...to much for them to remember how to work with it.

 |  IP: Logged

Brad Miller
Administrator

Posts: 17775
From: Plano, TX (36.2 miles NW of Rockwall)
Registered: May 99


 - posted 07-26-2007 03:05 AM      Profile for Brad Miller   Author's Homepage   Email Brad Miller       Edit/Delete Post 
What are you smoking Monte? It is even BETTER for booth monkeys to deal with because it is one less thing to go wrong! On most automations, the exciter relay isn't latched until the douser would open. You simply move the two wires from the xenon relay over to the exciter relay on the automation and that's it.

 |  IP: Logged

Monte L Fullmer
Film God

Posts: 8367
From: Nampa, Idaho, USA
Registered: Nov 2004


 - posted 07-26-2007 05:32 AM      Profile for Monte L Fullmer   Email Monte L Fullmer   Send New Private Message       Edit/Delete Post 
Oh do agree with you Brad on doing the mod and the leader thing, but just can see that procedure being kept in force from trainer, to trainer, to trainer ..etc..

Sorry for being a bit negative on this topic, but been around too many booth monkeys who doesn't care about presentations and with me caring isn't one of their concerns...and I can't enforce it what I'm coming from since the mgrs doesn't care much either...rather depressing situation at times, if you ask me.

 |  IP: Logged

Paul Konen
Jedi Master Film Handler

Posts: 981
From: Frisco, TX. (North of Dallas)
Registered: Jun 99


 - posted 07-26-2007 08:49 AM      Profile for Paul Konen   Email Paul Konen   Send New Private Message       Edit/Delete Post 
Mainly because of the older douser issue, I have trained my staff to close the hand douser until the black leader is in the film gate and then they open it. I start the projector during the middle of the preshow freeze frame and don't want white light through clear leader showing up on screen.

 |  IP: Logged

Mark Gulbrandsen
Resident Trollmaster

Posts: 16657
From: Music City
Registered: Jun 99


 - posted 07-26-2007 09:08 AM      Profile for Mark Gulbrandsen   Email Mark Gulbrandsen   Send New Private Message       Edit/Delete Post 
Brad,

quote: Brad Miller
It's called opaque black leader, Mark. You have the lamp strike on the black leader and then set up your cueing system from there, whether it be 8 seconds later or a minute via a start cue. Removing the douser takes that aspect of failure completely out of the chain. They simply are not needed on platter installations.

Well, the cue for me is having to set up the cues. Thats not going to happen with booth monkeys so try again...

You need to work in the real world for a while... where you have 700 customers with 500 dfferent ideas of how it should be done and ultimately 300 booth monkeys operating... most of em new! Its fun, its challenging, and you make a ton of money. The C/O is a tool that no one needs even know is there and it works without cue tape. Ultimately its the customers decision how its done and they are always right ya know.

quote: Tristan Lane
I'd assume that the old projectors with the phillips screws will require the removal of the front panel, but as far as I know, the majority of SLC consoles have screws on the front panels, and the newer SLC consoles have screws securing the snood.

If they weren't so dam tight a right angle screw driver would be possible... but they're too tight. Removing the front cover isn't a real big deal an on SLC. The people likely to have problems would be those that have CH consoles or Strong. Most of those are rivited in place. I have P-35GP's that go back to when they first came out and some P-35C's that had the goofy idler for the intermittent drive that I converted over to the GP model (the factory said it couldn't be done...ha, in reality it takes less than 3 hours to do.)

Mark

 |  IP: Logged

John Hawkinson
Film God

Posts: 2273
From: Cambridge, MA, USA
Registered: Feb 2002


 - posted 07-26-2007 05:25 PM      Profile for John Hawkinson   Email John Hawkinson   Send New Private Message       Edit/Delete Post 
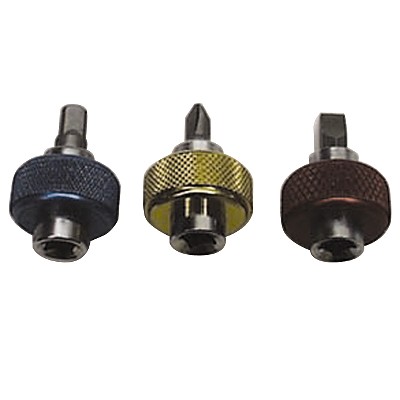
I don't know if this is really relevant, but recently I was in right-angle screwdriver hell, and I ran across these at Sears:

 -

"Finger Bit Drivers," Craftsman #41390. Seem to work decently, and you can drive them with a 1/4" ratchet. For scale, the knurl is a 1" diameter.

--jhawk

 |  IP: Logged

Monte L Fullmer
Film God

Posts: 8367
From: Nampa, Idaho, USA
Registered: Nov 2004


 - posted 07-26-2007 06:35 PM      Profile for Monte L Fullmer   Email Monte L Fullmer   Send New Private Message       Edit/Delete Post 
Yea, got a set of them in my toolbag that I bought at Sears back in 2002 ... Best little tools to have in the bag when it comes to tight corners. That enlarged knurl area really helps on the turning torque in tight places.

Along what's handy is that the bit is magnetially held in the socket for the usage of interchangeable 1/4" bits of any size, length, tip, et.al.

Even on a 1/4" socket wrench where if you can't rotate the wrench, the knurl does that for you while you're pushing down on the wrench for stubborn nut or bolt.

Yes, a must for every tekkie out there and not expensive at all. - Monte

 |  IP: Logged

Thomas Pitt
Master Film Handler

Posts: 266
From: Leeds, West Yorkshire, UK
Registered: May 2007


 - posted 07-27-2007 03:10 AM      Profile for Thomas Pitt   Email Thomas Pitt   Send New Private Message       Edit/Delete Post 
What usually happens in Vue Leeds Light is the projectionist (or timer) starts the show; and the douser opens at that time. As soon as the film is up to speed, the lamp strikes. If they've put the film in the right place, the lamp should strike just as the first advert is about to start, so none of the leader is projected.

Often the lamp doesn't strike immediately, so you get the sound from the advert shortly before the picture appears. At the end of a showing, however, it's a little different. The final cue closes the douser, resets the lens turret and masking to flat (if it was a scope feature), puts lights up, and switches the sound back to non-sync. The film then tails out through the projector, but the lamp doesn't switch off until it has gone out of the projector completely. Is there any reason for this?

In Vue Sheffield, on the other hand, the lamp strikes as soon as the start button is pressed. When the film is up to speed and the lights have gone down, the douser opens to display the first advert. For some reason, this causes a tiny glitch in the non-sync sound - it briefly cuts off, then comes back on and fades down slowly, before switching over to the film sound.

 |  IP: Logged

Paul Konen
Jedi Master Film Handler

Posts: 981
From: Frisco, TX. (North of Dallas)
Registered: Jun 99


 - posted 08-11-2007 01:45 AM      Profile for Paul Konen   Email Paul Konen   Send New Private Message       Edit/Delete Post 
Got three done tonight. I'm drilling the hole for the new handle from the top. I went around on one side of the complex and marked the location of the hole. (Trying to do as much prep work as possible).

So, one of them I can't get the knob on. Have to drill that one out. Also, the kicker, douser, whatever you call it wouldn't swing all the way closed. Had to make an adjustment. Hope more aren't like that.

You probably WILL have to swap the black / gray wires to make it work correctly.

Beware of the creme colored solenoids. The inner diameter seems to be a touch smaller than the blue solenoids.

Takes about 35-40 minutes to do. Helps to remove as much as you can during credits so you have time to get it all done.

I'll supply some pics if I can.

 |  IP: Logged

Mark Gulbrandsen
Resident Trollmaster

Posts: 16657
From: Music City
Registered: Jun 99


 - posted 08-11-2007 09:25 AM      Profile for Mark Gulbrandsen   Email Mark Gulbrandsen   Send New Private Message       Edit/Delete Post 
Paul,

Did you pull the fronts off the consoles or get the little screwdrivers at Sears? I agree on the solonoids! If the creame ones are present I always replace them with one that has more armature clearance. Yes you do have to reverse the wires since the action is the opposite of the old system.

Mark

 |  IP: Logged


All times are Central (GMT -6:00)
This topic comprises 2 pages: 1  2 
 
   Close Topic    Move Topic    Delete Topic    next oldest topic   next newest topic
 - Printer-friendly view of this topic
Hop To:


Powered by Infopop Corporation
UBB.classicTM 6.3.1.2

The Film-Tech Forums are designed for various members related to the cinema industry to express their opinions, viewpoints and testimonials on various products, services and events based upon speculation, personal knowledge and factual information through use, therefore all views represented here allow no liability upon the publishers of this web site and the owners of said views assume no liability for any ill will resulting from these postings. The posts made here are for educational as well as entertainment purposes and as such anyone viewing this portion of the website must accept these views as statements of the author of that opinion and agrees to release the authors from any and all liability.

© 1999-2020 Film-Tech Cinema Systems, LLC. All rights reserved.